It is impossible to over emphasise the importance of correct lubrication, inspection and running adjustments, if you wish to obtain the best level of service from your Ford Anglia and Ford Prefect. Every 1,000 miles (1,600 km) the following work, mainly lubrication, should be carried out.
(This periodic service was extended to every 2,500 miles)
The 1,000 / 2,500 Mile service also incorporates:
Daily: Check the Engine Oil Level
Daily: Check the Radiator Level
Daily: Check the Petrol Level in the Tank
Daily: Check the Windscreen is Clean
Weekly: Check the Battery Electrolyte Level
Weekly: Check the Brake and Clutch Fluid Reservoir Levels
Weekly: Check the Operation of all Lights
Weekly: Check the Tyre Pressures
Check the Gearbox Oil Level
Check the Rear Axle Oil Level
Check the Steering Box Oil Level
Check the Fan Belt Adjustment
Check the Clutch Adjustment at Operating Cylinder
Check the Windscreen Washer Level (where fitted)
Check the Seat Belts for Security and Wear (where fitted)
Lubricate all Grease Gun Points (L1 – L5)
Lubricate Linkages and Locks
Lubricate the Distributor
Check the Gearbox Oil Level
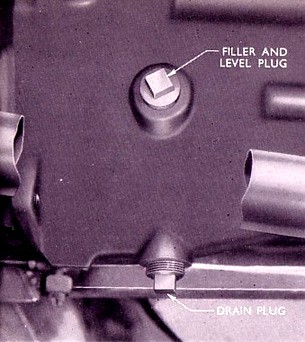 With the car standing on level ground, remove the combined filler and level plug, which is located on the side of the gearbox. Check the oil level, which should be level with the bottom of the filler plug hole. If required, top up with Extreme Pressure Gear Oil. The oil may be added by means of a suitable gun through the combined level and filler plug until the level reaches the bottom of the filler plug hole. Replace the filler plug and tighten securely.The oil in the gearbox should be maintained to the level of the filler plug at all times. Insufficient oil will accelerate wear on the gearbox parts, whilst too high an oil level may result in the oil passing into the clutch housing with consequent ill effects on the clutch facings.
Check the Rear Axle Oil Level
 With the car standing on level ground, remove the combined filler and level plug, which is located halfway up the axle (on earlier cars there is also a drain plug located in the bottom of the axle.) Check the oil level, which should be level with the bottom of the filler plug hole. If required top up with the correct Grade of Oil until the level reaches the filler plug hole.
NOTE – Only Hypoid and not ordinary gear oil is to be used in the rear axle.
Replace the filler plug and tighten securely. Periodically check the tightness of the filler plug.
Check the Steering Box Oil Level (Anglia)
 With the car standing on level ground, remove the rubber plug on top of the steering box. Check the oil level, which should be level with the filler plug hole. If required top up with Extreme Pressure Gear Oil until the level reaches the filler plug hole. Replace the rubber plug. The Steering Gear is of the worm and nut and apart from the periodic lubrication described above, requires adjustment and attention only at fairly long intervals.
Check the Steering Gear Oil Level (Prefect)
 With the car standing on level ground, remove the filler plug in the top of the steering gear housing. Check the oil level, which should be level with the filler plug hole. If required top up with the correct Grade of Oil until the level reaches the filler plug hole.Replace the filler plug and tighten securely. The Steering Gear is of the worm and peg type and apart from the periodic lubrication described above, requires adjustment and attention at fairly long intervals.
Check the Fan Belt Adjustment
 The same V-Shaped belt drives both the generator and water pump. The belt adjustment is correct when, as it is pushed and pulled at a point midway between the generator and water pump pulleys, the total movement of the belt does not exceed ½ in (12.7mm). A loose belt causes slip on the pulleys, while excessive tightness results in wear on the generator and water pump bearings and the belt itself.To adjust the fan belt tension, loosen the two generator lower mounting bolts, one at the front and one at the rear, then loosen the adjustment locking screw at the front of the generator. This will allow the generator to be moved outwards, the adjustment screw sliding in the slotted arm.When the correct tension is obtained, tighten all three bolts securely.
Check the Clutch Adjustment At Operating Cylinder
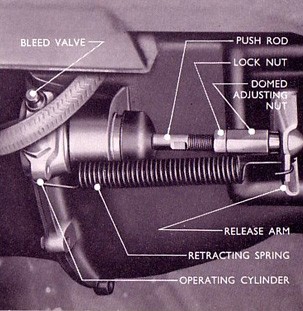 The amount of free travel on the clutch release arm should be checked and adjusted if necessary. The clearance between the end of the clutch operating rod adjusting nut and the clutch release arm should be 1/16in (1.6mm)
Compensation for wear is easily made by adjusting the length of the clutch operating rod. To obtain the correct clearance, disconnect the release arm return spring, slacken the operating rod locknut and turn the domed adjusting nut at the end of the push rod clockwise to increase the free movement and anti-clockwise to reduce it.After making the adjustment, ensure that the locknut is tightened and the return spring is re-located.
Check the Windscreen Washer Level (where fitted)
 The windscreen washer container is located on the left hand side of the engine compartment on the bulkhead next to the heater.The container is made of an opaque plastic and so you should be able to see whether the windscreen washer fluid needs topping up. If the level is low, remove the cap from the container and fill with a suitable screen wash solution. Refit the container cap.
Check the Seat Belts for Security and Wear (where fitted)
Check along the length of the webbing on each belt to see if there are any nicks or tears in the material. Sit in the vehicle and then test the buckle, making sure that it opens and closes smoothly and does not stick. Gently pull on the closed buckle to see if it is secure. Check that the seat belt adjustment works correctly by adjusting the belt to see that the belt moves smoothly through the adjuster and does not snag on anything. (Remember to re-adjust it to your needs before using the car.)
Warning – If the belts look defective in anyway, or you are unsure about what to look for, have the belts checked by your Authorised Ford Dealer or a trained Mechanic. Do not take risks. Your life may depend on the security of the seat belts.
Lubricate all Grease Gun Points
It is essential that a high-pressure grease gun be used to force a good quality grease in to parts equipped with the conical shaped non-return lubricators (grease nipples).A Grease Gun can be purchased from your Authorised Ford Dealer. To fill the grease gun, remove the cap and plunger, pack the body with grease solidly excluding as much air as possible, then replace the cap and plunger. Use a high grade grease for all bearing surfaces.
It is important that dirt and old grease are cleaned from around the lubricators before applying a grease gun to them.
The lubrication Chart below shows the approximate position of the lubricators.

For convenience the grease gun points are also briefly described separately after the chart.
Grease Gun Point – Track Control Arm – (L1)
 The ball joint at the outer end of each track control arm support is fitted with a lubricator, which can be reached from beneath the front of the car, forward of the front suspension cross tube.
Grease Gun Point – Track Rods – (L2)
The ball joint at each end of the right and left hand track rods are fitted with grease gun lubricators.
Grease Gun Point – Steering Arm to Idler Arm Rod – (L3)
 A lubricator is fitted at each end of this rod to facilitate lubrication at the ball joints.
Grease Gun Point – Idler Arm (Anglia – L4)
The upper support bearing on the idler arm bracket has a lubricator fitted in the centre of the retaining cap nut.
Grease Gun Point – Idler Arm (Prefect – L4)
 One lubricator is fitted at the rear bush of the idler arm, and is reached from above, the other is on the bush at the front of the arm, and is reached from below the car.
Grease Gun Point – Universal Joints – (L5)
 Each universal joint is fitted with a lubricator at the centre of the spider. Apply a gun containing SAE 250 oil or multi purpose lithium base grease at these points and lubricate as necessary.
Lubricate Linkages and Locks
A few drops of light oil should be applied to the accelerator linkage bearings, hand brake clevises, bonnet hinges, door hinges and locks, etc.The door locks may be lubricated through a small hole in the rear edge of each door, above the lock. Make sure that all runs or drips of oil that are visible on the doors are wiped away with a clean dry cloth to prevent the soiling of clothing when entering the vehicle.
Lubricate the Distributor
 Release the two spring clips and remove the distributor cap and rotor. Apply one or two drops of engine oil at the cam retaining screw and spindle to lubricate the distributor shaft bearings.
Apply a thin film of petroleum jelly to the contact breaker cam and lubricate the contact breaker pivot post with a small film of engine oil, ensuring that the contact breaker points are not contaminated.
Information taken from Various Ford Anglia and Ford Prefect Instruction Books and Handbooks.
Warning – The Health and Safety bit
Please note your health may be at risk if you do not take sensible safety precautions. Never work under an unsupported vehicle, do not take shortcuts. If you feel that the task is beyond your capabilities, then employ the services of a trained professional. The Ford Anglia 105E Owners Club nor the author cannot be held responsible for any accidents or injury arising from advice given on this webpage. Safety advice can be obtained from the RoSPA. The advice and opinions given are purely those of the author and not necessarily those of the Ford Anglia 105E Owners Club.